Sunday, October 31, 2010

Giraffe Cake

My friend, Meghan, had her sixteenth birthday party the other day, and I volunteered to make a cake. She said she liked layered cakes and giraffes, so I decided to put them together and make a 2 layered cake with a 3D giraffe on the top. The ingrediants I used were, 1 chocolate cake mix, 1 funfetti cake mix, 2 cans of vanilla frosting, 1 box of regular white fondant (can buy at AC Moore or Michaels, or the Wilton website.), rice crispy treats, yellow, orange, purple, black, yellow, green, and pink food coloring, blue sparkly frosting gel, coconut, and silver edible candies ( I got these from a friend who bought them a long time ago so I don't know where you could buy them, sorry =[ )

First, I made the funfetti cake in the big round pan and the chocolate cake in the smaller circle pan. I let those cool overnight and then cut the tops off to make them flat. Then I frosted both cakes with a first thin layer of vanilla frosting and let that cool in the fridge. After that's cool, I did the final coat of vanilla frosting. Then I started the fondant parts. I bought pre-colored neon purple, orange, pink, and yellow frosting, which is what I used for the flowers and stripes. I cut the stripes into 1/4 inch stripes using a Wilton ribbon cutter and embosser set. You could also just measure out the strips using a ruler and cut them with the ruler and a knife. I just laid these on top of the bottom cake, each were separated by about 1 and 1/4 inches of frosting.


After that, I started cutting out the flowers. I cut out about 7 orange ones and 7 pink ones. I had a medium sized flower cutter from the cake class I took, so I just used that, but you could use anything really, or just cut them out with a knife. Then I used a small circle cutter to cut out 14 yellow flower middles and stuck those onto the flowers. I used a knife to cut some of the flowers in half randomly and stuck them on the cake, every other color. 


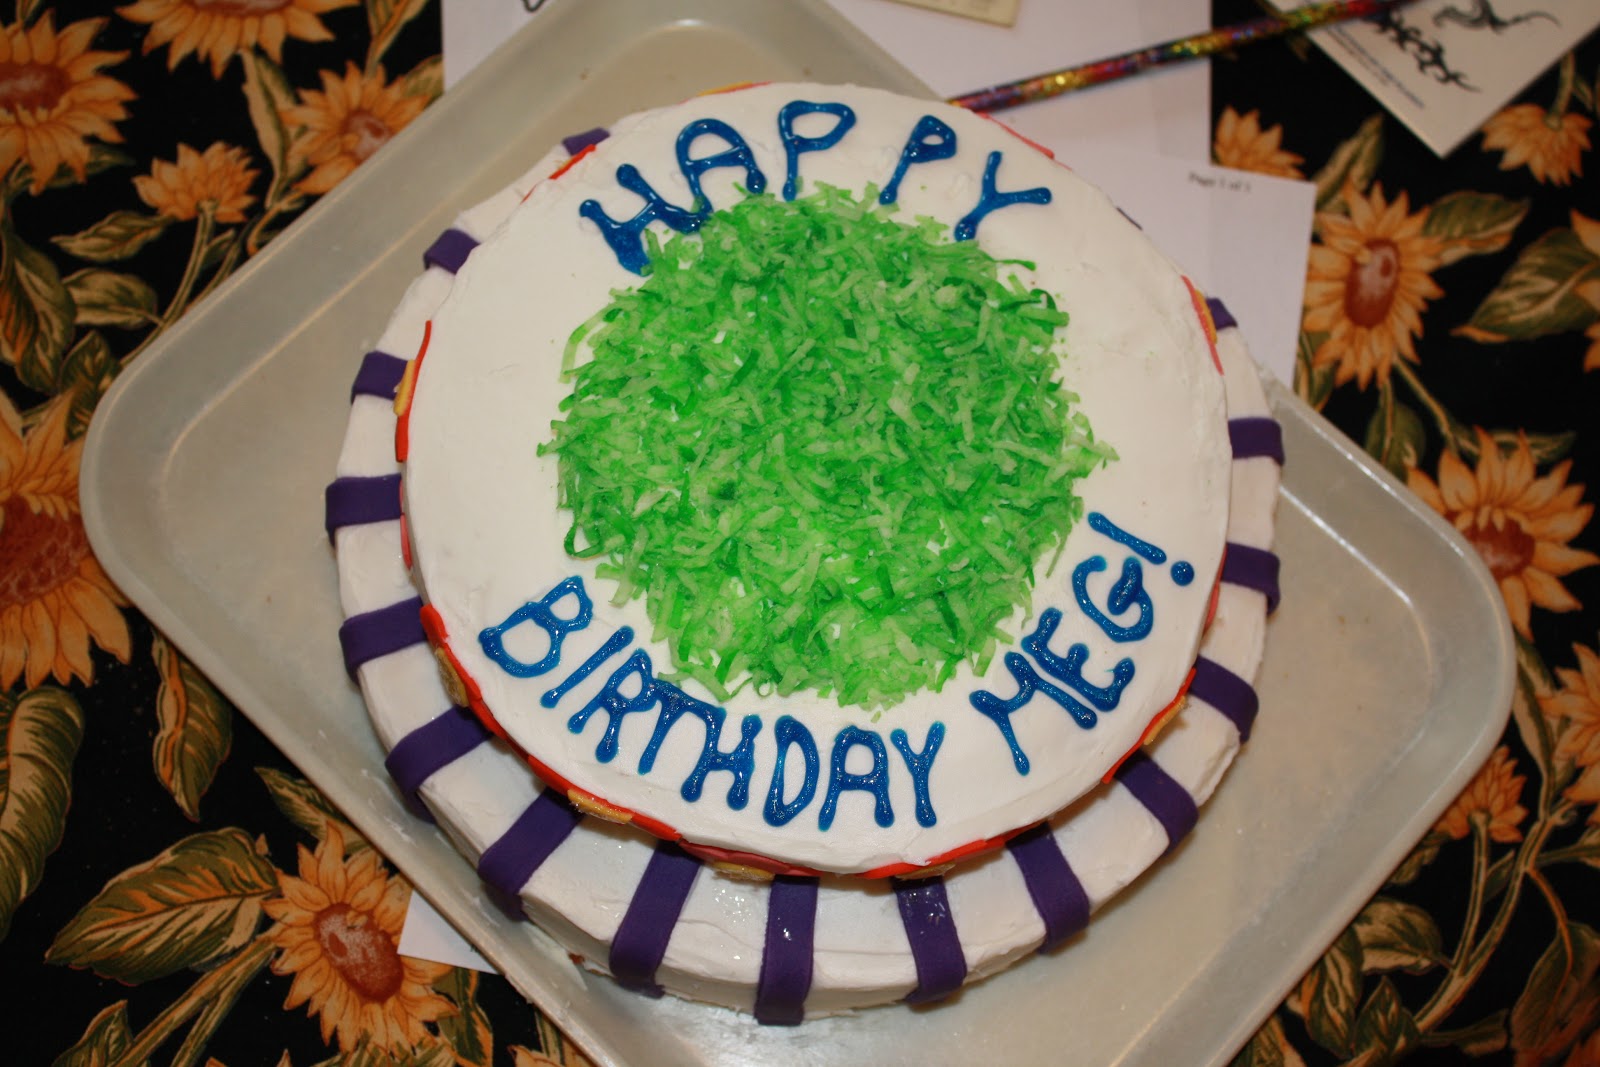
Next, I died the coconut orange for the grass. I just threw the coconut in a bag and mixed it with the green food coloring. Just a handful will do it, and then throw it in the center of the cake. Then I wrote "HAPPY BIRTHDAY MEG!" on the cake with the blue sparkly frosting gel. Obviously, you can just write whatever you want. 


Finally, I worked on the giraffe. I molded the giraffe from rice crispy treats. I was running low on time and didn't have enough time to make my own rice crispy treats, so i cheated and bought a box of them at the grocery store. I just kind of stuck them together and made the shape of a giraffe. I stuck the legs, neck, and head into the body with wood skewer things. 


Then, I stuck the giraffe in the freezer to stick together for about 5 minutes. While it was freezing, I got out the box of white fondant and started rolling it out to cover the giraffe in, Then I took the giraffe out of the freezer and kind of cut the fondant into rectangles to stick around the legs, neck, and body. I just kind of wrapped them around the rice crispy treat and tried to smooth it out with my fingers. I also made the ears, tail and horns out of fondant and just stuck those on. Then I mixed the yellow and orange food coloring together in a little bowl until I got a brown color that I thought would look good on my giraffe. Then I used a paintbrush and started randomly painting giraffe spots onto my giraffe.


This took a long time and I wish I made the spots a lot bigger, so keep that in mind. I also painted the eyes and the feetsies black with the black food coloring. To stick the giraffe in the cake, I stuck some more wood skewers into the giraffes feet and the cake and it stood up for a good 2 hours until we decided to eat it. I also threw some of the silver edible candies in the spaces between the purple fondant stripes. 


Tuesday, October 26, 2010

Garden Cupcakes

So my mom's garden club was having a party and she was asked to bring dessert. She knows I love to make desserts so she asked me if I wanted to do something. I said yes because there's this recipe in my book 'Hello Cupcake' that has garden cupcakes. For ingredients, I used vanilla cake batter, chocolate frosting, crushed oreos, 4 graham crackers, white chocolate wafers, white frosting, red, blue, green, & orange food coloring, a piece of 5 gum, pretzel sticks, chocolate covered sunflower seeds, frosted flakes, green m&m's, 6 red starbursts, 4 orange flavored tootsie rolls, 6 orange starbursts, 3 white vanilla flavored tootsie rolls, and 6 green tootsie rolls. For all of the candy pieces at the end, I just went to Market Basket and got a bag of mixed candy for like a pinata or something.

To make these cupcakes, I baked them, obviously, and then frosted them with the chocolate icing. Then I crushed the oreos and put them on top of the cupcakes. Then I worked on one vegetable at a time. We'll do the radishes first, I took the white tootsie rolls and cut them up into fourths and rolled them in my hands to get them warmed up and easy to shape. Then you take the red starbursts and cut them probably in half, give or take. Then you roll those around in your hands and kind of mush the two colors together and roll it around to get the radish shape. Make five of these and stick them on the column of cupcakes on the left. 
Then, for the peas, you take the 4 green tootsie rolls and warm them up in your hands and then flatten them out with a rolling pin to get a round shape, you can cut it with a knife to get this. Then, you stick about 4 green m&m's in the middle of the oval and fold it over to look like a pea. Make four of the peas and stick them in the second to left column and skip one space.

Next, for the carrots, you take the four orange tootsie rolls and roll those around in your hands to get the big carrot shape. Do this to all four of the tootsie rolls and stick them in the cupcakes randomly in the second to right column. Then, take the orange starbursts and do the same thing that you did with the larger ones. Stick those in randomly in the cupcakes too. You can take some crushed oreos and sprinkle those on the carrots to make them look fresh. 

Next, for the lettuce, take the white frosting and stick it in the microwave for about 10 seconds - ish. Keep an eye on it because things with more sugar heat up more quickly. Take about half of the frosting and dye it green. Then take a cookie sheet with wax paper on it and throw about a cup or so of the frosted flakes onto it. Then pour the green melted frosting over the frosted flakes. This really got my hands covered in frosting, and is difficult to do when it's hot out. It gets really sticky and I don't really know a better way to do it. Stick those in the fridge to get nice and cold and then take the green tootsie rolls and cut the two remaining ones in half and roll those pieces around in your hands and make a ball shape and stick them into the middle of the right column of cupcakes for the center of the lettuce. Leave one of the cupcakes empty. Once the frosted flakes are cold, which I'm pretty sure I left those in overnight, you can take them off the cookie sheet and stick them into the lettuce cupcakes all around the green center. Also stick about two frosted flakes at the end of the radishes you made first. 

Then, for the signs, take the white chocolate wafers and melt them in a bowl in the microwave for 10 second intervals until they're melted. Then, cover 4 halfs of the graham crackers with the white chocolate and stick those onto a wax paper covered cookie sheet and let that cool in the fridge. When that's cool, take a pretzel stick and stick it onto the back of each sign with frosting and let that cool. Then, take the remaining white frosting and die it red, green, orange, and blue. Also get the chocolate frosting out. Put those frosting colors into little ziplock bags and just snip a little tiny hole at the end and pretty much design the signs however you want to. You can do a little border with the blue and write the name of the vegetables in the chocolate and draw the veggies on the signs, go crazy. Then stick those in the cupcakes in the furthest row in order of the veggies you made.

Lastly, some pretzel sticks and break them off about whatever height you think a shovel would look good in your garden. then break off another smaller piece and glue it onto the longer piece with frosting, that'll be the shovel's handle. Then take the piece of 5 gum and cut it in half and fold it to make it look like a shovel spade and glue that onto the long shovel part with frosting. Make two of these and stick them into the last two empty cupcakes. Finally, take the chocolate covered sunflower seeds and scatter them onto the cupcakes with the shovels. You can stick them onto the cupcakes with frosting if they keep falling off.


Sunday, October 24, 2010

Halloween Cupcakes

So, the other day I was hired to make some halloween cupcakes for my friend's party. I decided to make a graveyard with headstones, a fence around it, and an entrance. I also colored the cupcake batter yellow and orange and mixed them in the cupcakes so it would make the cupcakes more halloween-ish. Below I included pictures and the how- to on making these graveyard cupcakes. Oh yeah, for ingredients I used 1 box of white cake mix, yellow and orange food coloring, chocolate and white chocolate melting wafers, chocolate frosting, oreo cookies, milano cookies, white frosting, black gel frosting, and candy corn (optional)
First, I made white cupcake batter so that it could easily be colored. I separated the batter about half and half and colored them orange and yellow. Then I poured the orange batter in each cupcake about one fourth and then I poured the yellow batter a little more so each cupcake was about 2/3 full of batter.
Then I cooked the cupcakes for the time listed on the box, about 20 minutes I think. They came out looking like the picture above. Then I let them cool for a while. Whilst they were cooling, I started making the fence to go around the graveyard. I did this by melting some chocolate wafers in a ziplock bag, no sealed, in the microwave with 10 second intervals. Then I sealed the bag up and snipped a hole in one corner. I covered a cookie sheet with wax paper and then just drew out some fences and a gate for the graveyard. I also melted some white wafers and wrote CEMETARY onto the sign for the graveyard. Too bad I'm retarded and thats not how you spell cemetEry. Whatever. Then I stuck those in the fridge and left 'em overnight.


While those puppies were getting cold in the fridge, I frosted the cupcakes with chocolate frosting. Then, I crushed up some oreos in a bowl and took each cupcake and rolled the top to cover it in oreos to look like dirt. 
Then i started to make the headstones. I did this by taking some milano cookies and cutting the bottom half to a point so it could easily be stuck into a cupcake. I then frosted the cookies with vanilla frosting, and then took some black gel frosting and wrote scribbles or R.I.P.
Then I stuck the headstones into the middle 6 cupcakes. Then I took the fence and entrance to the graveyard out of the fridge and stuck those into the cupcakes. I broke the fence a little in random places to make it look old and scarier. Then I sprinkled some candy corn onto the bottom of the cupcake holder and stuck some plastic cats into some cupcakes. You could also go crazy and add some pumpkins or something else to the graveyard.